3 MIN READ
Decor Ideas
Written By
G2G Team
Published
October 13, 2025
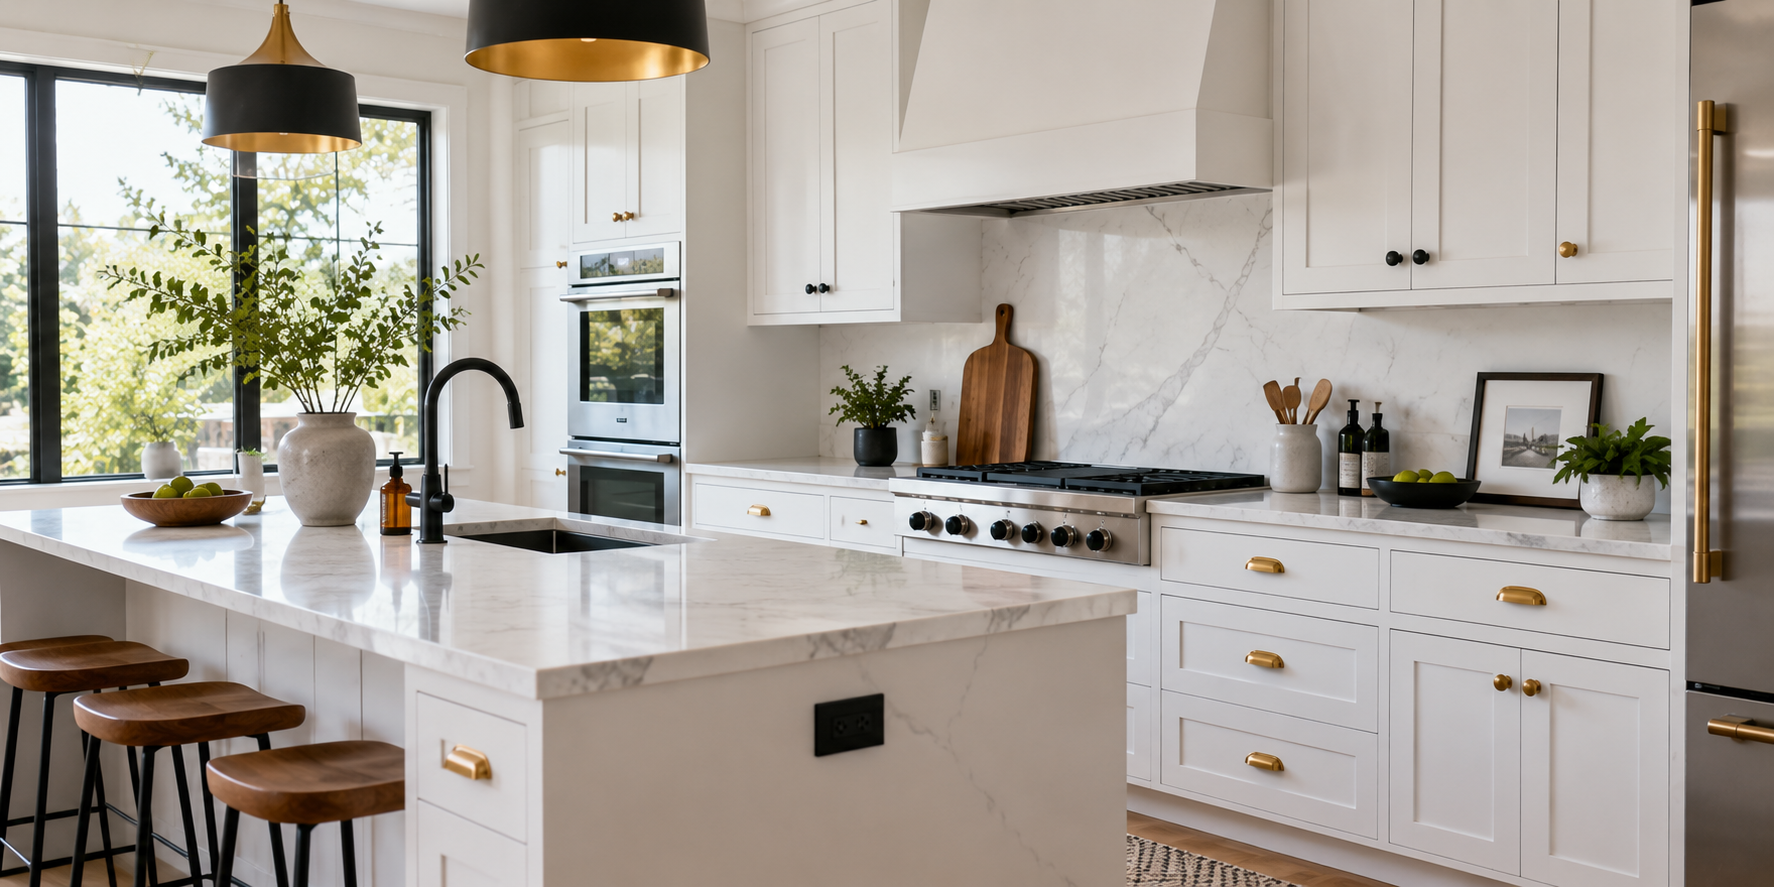
If you are looking to introduce a vibrant and personal element to your home, colorful DIY chevron decor is an exceptionally popular option for a chic and customizable accent. The pattern’s bold design and lively colors can invigorate any room, establishing it as a preferred project for DIY enthusiasts and interior decorators.
This guide presents a collection of creative ideas for crafting your own colorful chevron pieces to complement any style or event. Whether you are furnishing a nursery, revitalizing your living room, or embarking on a new craft project, these concepts will provide the inspiration needed to create distinctive and visually appealing decor that showcases your unique personality and style.
![]()
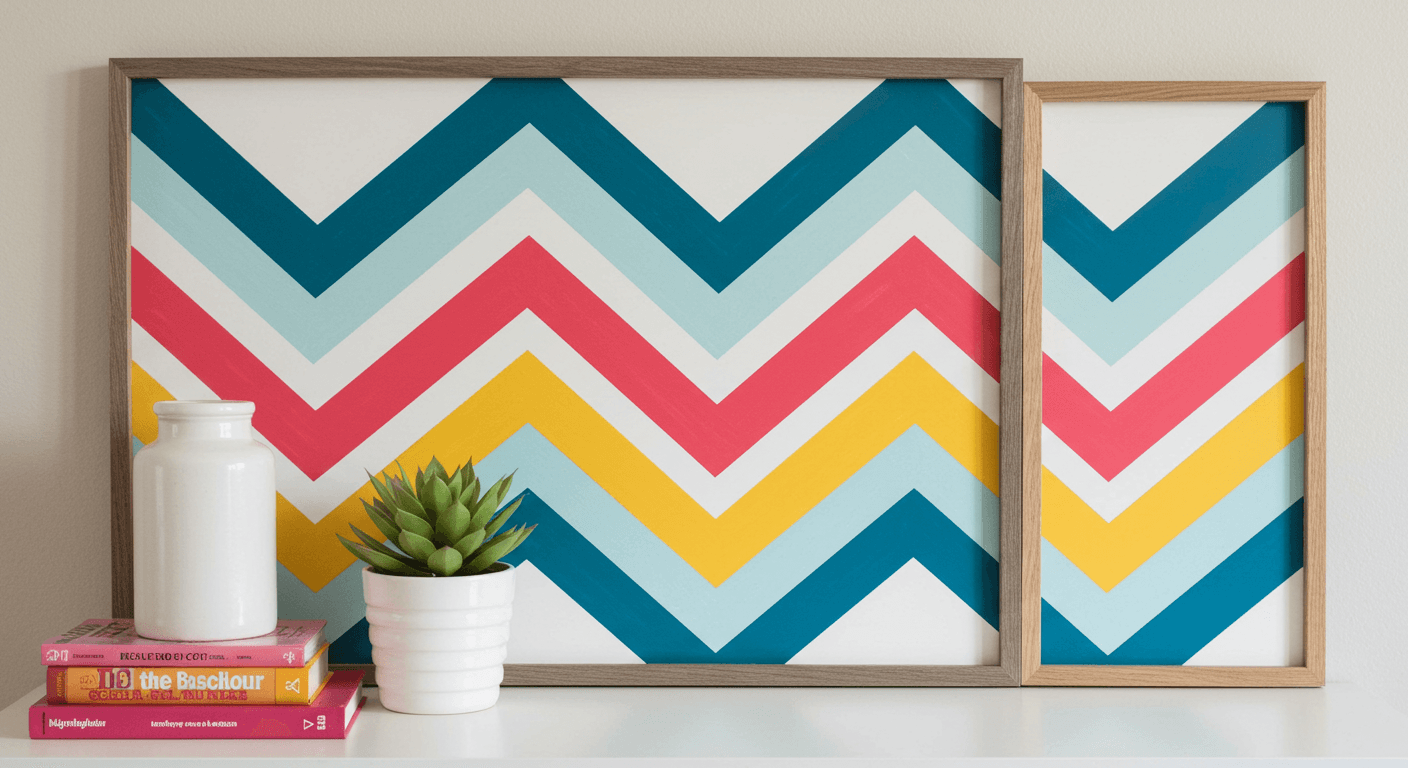
A bold statement piece can instantly transform a monotonous wall. Often, an empty wall space requires a touch of personality. Designing compelling decor does not need to be complex or costly, but it should align with your personal aesthetic. If you are seeking an alternative to generic wall art, this DIY chevron project may be an ideal solution.
Consider large wooden planks arranged horizontally, each painted with vivid hues in a zigzag formation. The natural wood grain provides a beautiful contrast to the sharp, clean lines of the chevron pattern. When displayed above a sofa or headboard, the colors reflect light and establish a dynamic focal point. The blend of organic wood and bright paint creates a statement that is simultaneously modern and inviting.
You can adapt the color scheme to suit your room’s decor, using pastels for a softer ambiance or neon shades for a more energetic feel. For a rustic aesthetic, select distressed wood and muted colors. The length of the planks can be adjusted to fit your wall space, and you can explore variations by combining chevrons with stripes or polka dots. Changing the colors seasonally ensures the artwork remains fresh throughout the year.
To begin, gather wooden planks, ideally reclaimed for added character, and sand them until smooth. Use painter’s tape to create the chevron pattern, then apply acrylic or durable exterior paint to each section. To protect the finish, seal the project with a clear coat. Hang the completed art with heavy-duty hooks or brackets, ensuring it is level for the best visual effect. For a simpler method, consider using pre-cut wooden panels or veneer sheets.
For a more personalized design, integrate metallic accents or glitter into specific sections. You can also stencil initials, meaningful symbols, or other patterns into the design. To create a more dynamic piece, layer textures such as fabric or decorative trim along the edges. The artwork can be framed for a polished look or left unframed for a raw, natural appearance. This DIY project is an excellent way to express your creativity and infuse your living space with a vibrant personality, turning a plain wall into a work of art.
![]()
Lively planters can significantly brighten a room or patio, but standard terracotta pots can sometimes feel uninspired. If you enjoy cultivating plants but want to add a personal touch to their containers, painting chevron patterns on your pots is a simple method for enhancement. This project is also ideal for those who desire a splash of color without a significant commitment.
Imagine a series of small ceramic pots, each decorated with bold, colorful chevron stripes in shades of turquoise, coral, and yellow. The glossy paint provides a smooth finish, while the patterns lend a playful, modern aesthetic to each pot. Placed on a windowsill or an outdoor table, these planters immediately capture attention with their cheerful design. The contrast between the natural greenery and the vibrant patterns makes your plants stand out.
You can customize the design to fit your style; consider subtle pastel chevrons for a more understated look or use metallic paints for a touch of luxury. Using pots of various sizes allows for different pattern widths, which adds visual interest. Seasonal themes are also effective, such as icy blues and silvers for winter or bright floral colors for summer. For durability, use waterproof or outdoor-grade acrylic paints.
Begin by thoroughly cleaning the pots and lightly sanding the surface to improve paint adhesion. Use painter’s tape to mask out the chevron pattern, or paint it freehand for a more organic appearance. Apply several thin coats of acrylic paint, allowing each layer to dry completely before applying the next. Carefully remove the tape to reveal crisp edges. Finish with a clear sealant to protect the paint from water and soil. You can also add embellishments like glitter for extra flair.
Personalize your pots by hand-painting initials, small motifs, or contrasting patterns within the chevrons. Mix and match colors based on your decor or the plants themselves. For a rustic finish, use chalk paint, which creates a matte look that can be easily updated. Alternatively, you could apply decoupage with textured paper or fabric for a layered effect. These decorated pots transform ordinary planters into artistic accents that reflect your personality and brighten any living space or garden.
![]()
If your plain throw pillows seem lackluster, adding color and pattern can instantly refresh your sofa or bed. However, purchasing new decorative pillows can be costly, and pre-made slipcovers may not match your vision. Creating DIY chevron pillow covers is a straightforward way to enhance your decor affordably.
Visualize a set of fabric pillow covers in a neutral base color, each featuring bold chevron stripes in contrasting bright shades like pink and teal. The fabric is smooth and durable, suitable for daily use. When placed on a sofa, they create a vibrant, contemporary appearance. The zigzag pattern introduces a sense of visual movement, making the space feel more dynamic and modern.
You can alter the colors to align with seasonal themes, such as warm reds and oranges for autumn or cool blues and grays for winter. Experiment with different fabrics: linen offers a rustic feel, velvet provides a sense of luxury, and cotton is ideal for everyday comfort. For a simple application, use iron-on transfers or fabric paint. For a more integrated design, you can sew the chevron pattern directly onto the fabric. Varying the sizes and shapes of the pillows adds further interest.
Start by cutting the fabric to the required pillow dimensions, adding a seam allowance. Use stencils or painter’s tape to outline the chevron pattern, then apply fabric paint or markers. For a more professional finish, sew the pattern onto the fabric or attach pre-cut fabric strips with a sewing machine. After inserting the pillow form, sew the opening closed or install a zipper for easy removal and washing. Finally, iron the pillow cover to set the paint or adhesive.
Add embellishments such as pom-poms, tassels, or metallic thread along the chevron edges for additional flair. Customize the color palettes to complement your existing decor. You can also embroider initials or small motifs within the pattern for a personalized touch. Layering different patterns and textures helps create a curated, eclectic aesthetic. These pillows offer a quick and enjoyable method for infusing personality into any room.
![]()
Children’s rooms benefit from a fun, playful atmosphere that can be easily updated as they grow. Painting bold stripes or murals, however, can be a messy and lengthy process. Chevron tape provides a quick and clean alternative for adding a whimsical touch without the commitment of paint. This is an ideal solution for creating a lively wall that is not permanent.
Imagine a softly colored wall accented with a border of bright, multi-colored chevron tape arranged in a zigzag pattern. The tape adheres securely but can be removed cleanly, leaving behind sharp lines. This pattern adds a sense of energy and motion, transforming a simple wall into an engaging feature. Playful colors such as yellow, turquoise, and pink contribute to a cheerful and welcoming environment.
You can use tape of varying widths to create stripes of different sizes or alternate colors for a rainbow effect. Design asymmetrical borders or combine the chevron pattern with other shapes like polka dots or stars. For themed rooms, coordinate the tape colors with bedding and accessories. Seasonal or holiday-themed tape can be swapped out easily, making this a versatile decorating technique. For a more sophisticated appearance, use metallic or pastel shades.
Begin by thoroughly cleaning the wall surface to ensure proper adhesion. Measure and mark the desired height for the border, then use painter’s tape to create straight guidelines. Carefully cut strips of chevron tape to fit your pattern, pressing down firmly to remove any air bubbles. A smoothing tool or a credit card can help ensure the tape is well-adhered. Once finished, carefully remove the painter’s tape to reveal clean, sharp lines.
For added fun, place small decals or stickers within the chevron pattern. Personalize the border with your child’s name or favorite characters using additional tape or markers. Incorporate glow-in-the-dark tape for a magical nighttime effect. Layering multiple patterns or adding metallic accents can create a more refined look. This method allows for quick updates as your child’s tastes change over time. Using chevron tape for wall borders is a simple yet effective way to refresh a child’s space with minimal mess and expense.
![]()
If you are looking for a quick method to add personality to your walls without a significant expense, canvas prints are a versatile option. However, generic artwork can sometimes lack inspiration. Creating your own vibrant chevron designs allows you to produce a custom piece that reflects your personal style and is certain to be admired.
Visualize a blank canvas transformed by bold chevron stripes in shades of coral, teal, and gold. The paint is applied with crisp, clean lines, resulting in a modern, graphic design. Whether displayed as part of a gallery wall or as a standalone piece, it immediately captures attention and establishes a lively atmosphere. The textured surface of the canvas adds depth and enhances the vibrancy of the colors.
You can select a monochrome palette for a sleek, minimalist effect or opt for a full spectrum of colors for maximum visual impact. Metallic paints or glitter accents can be used to add extra sparkle. Canvases of different sizes can be arranged creatively, from a single large statement piece to a cluster of smaller ones. The ability to swap colors makes it easy to refresh your decor seasonally.
Begin with a blank stretched canvas and lightly sketch your chevron pattern with a pencil. Use painter’s tape to mask off each section before applying acrylic or fabric paints. For sharper lines, use a steady hand and a thin brush. Allow each layer of paint to dry completely before removing the tape. To protect the finished piece, seal it with a clear acrylic spray. The canvas can be framed or left unframed for a contemporary look.
Add personal touches by incorporating initials, small symbols, or subtle patterns within the chevron sections. Use metallic or iridescent paints to create a shimmering effect. You can also incorporate textured mediums or mixed-media elements to add dimension. For additional style, consider mounting embellishments like metallic studs or fabric trims around the print. Creating your own chevron canvas print is a rewarding way to express your artistic side and provides a budget-friendly alternative to store-bought art.
![]()
Bunting is a classic choice for parties, celebrations, or simply adding charm to an everyday space. However, store-bought garlands can be expensive and generic. Creating your own chevron banners is a simple and enjoyable way to introduce vibrant flair and personalize your decor. This project is perfect for anyone wanting to add a cheerful, handmade touch to their environment.
Imagine strips of fabric or paper cut into chevron shapes, each in bright, coordinating colors like yellow, pink, and turquoise. These shapes are strung together with twine or ribbon, forming a lively, zigzag garland. When hung across a room, patio, or outdoor space, the banner instantly elevates the atmosphere. The movement of the flags, combined with the cheerful color, makes any area feel more festive.
For layered depth, use chevron shapes of different sizes or alternate fabric textures like burlap, felt, or shiny paper. Customize the color scheme to match seasonal themes or personal preferences. For outdoor use, select weather-resistant materials. The length of the garland can be adjusted to fit your space, or you can cluster multiple banners for a more dramatic effect. Adding small embellishments such as tassels or pom-poms enhances its playful quality.
To create the bunting, cut your fabric or paper into symmetrical chevron shapes using a template or ruler. Punch holes at the top of each piece and thread them onto twine, string, or ribbon. Secure the ends with knots or clips. Space the shapes evenly for a uniform appearance or group them for a more eclectic look. Hang the garland using hooks or pushpins, ensuring it is pulled taut and level.
Personalize your bunting with initials, small motifs, or themed symbols. Mix patterns and textures to create additional visual interest. For nighttime events, incorporate LED string lights. You can also attach small decorative elements like paper flowers or tassels to the flags. This DIY garland is easily adaptable for any occasion, from weddings and birthdays to simply brightening a kitchen. Colorful chevron bunting is a cost-effective way to make any space feel festive and welcoming.
![]()
Finding stylish storage solutions that do not resemble industrial containers can be a challenge, especially when dealing with clutter in a craft room or closet. While wooden crates are versatile, their plain appearance can be uninspiring. Painting them with chevron patterns transforms simple storage into decorative statement pieces that are both functional and fashionable.
Visualize rustic wooden crates adorned with bold chevron stripes in navy, white, and coral. The geometric pattern lends a modern touch to the classic crate design. Whether stacked or used individually, these crates provide decorative storage for craft supplies, books, or toys. The contrasting colors and patterns make the organization visually appealing and surprisingly chic.
Select different color combinations to match your decor, from monochrome for a sleek look to vibrant hues for a playful atmosphere. You can also vary the size and shape of the crates to create a dynamic display. For a shabby-chic aesthetic, lightly sand the painted surface to create a distressed effect. Incorporate metallic or glitter accents for an extra touch of glamour. Use labels or decals to identify the contents and maintain organization.
Begin by cleaning and lightly sanding the crates to ensure proper paint adhesion. Use painter’s tape to create the chevron patterns, or paint them freehand with a steady hand and a brush. Apply several thin coats of acrylic or chalk paint, allowing each coat to dry thoroughly. Seal the crates with a clear protective topcoat for durability. Arrange them in a way that maximizes storage while showcasing the design. For added mobility, you can attach handles or wheels.
Personalize the crates with stenciled labels, decorative hardware, or custom decals. Incorporate your favorite colors or metallic finishes for a trendy look. You can also add fabric liners or cushioned pads inside for storing delicate items. For a unique touch, paint the interior or sides with contrasting colors or patterns. These crates can become both functional storage and decorative focal points in any room.
![]()
Unattractive coasters can clutter a coffee table or dining area, and plain cork or wood options often fail to complement your decor. Applying colorful chevron patterns to coasters is a quick way to protect surfaces while injecting style into your space. They also make excellent handmade gifts.
Imagine a set of round cork coasters painted with bright, zigzag chevron stripes in shades like turquoise, gold, and blush pink. A glossy finish enhances the bold design and helps prevent water rings. When stacked or arranged on a table, they provide a pop of color and personality. The pattern’s sharp lines and vibrant hues transform ordinary coasters into eye-catching accents.
For variety, use different coaster shapes such as square, hexagon, or oval. Experiment with contrasting color schemes, like black and white or pastel shades, to suit your decor. Incorporate metallic or glitter paints for a luxurious effect. To ensure longevity, seal the painted surface with a waterproof varnish. Personalize them with monograms or small motifs for a unique touch.
Start by cleaning and sanding the coaster surfaces to ensure they are smooth. Use painter’s tape to outline the chevron pattern, or paint it freehand if you are confident in your brushwork. Apply multiple thin coats of acrylic paint, allowing each to dry completely. Finish with a waterproof sealant, particularly if the coasters will see frequent use. Attach felt pads to the bottom to prevent scratches on furniture.
For further personalization, add initials, symbols, or small decorative elements inside the chevron pattern using fine brushes or markers. Customize the color schemes to match your kitchen or living room decor. Use metallic or iridescent paints for a shimmering effect. You can also consider embedding small embellishments like rhinestones for added texture. These personalized coasters serve as both functional and decorative pieces, proving that small details can make a significant impact.
![]()
If you are tired of plain rugs that do little to enhance your space or are unable to find a statement piece that meets your exact specifications, painting or stenciling chevron patterns onto a basic rug is a fun, customizable solution. This project is surprisingly achievable and can have a significant visual impact.
Picture a neutral-toned rug featuring large, colorful chevron stripes in bright pinks and blues. The crisp pattern creates a modern, graphic effect that can anchor a room. The rug’s textured surface adds depth, while the vibrant colors energize the space. Whether placed in an entryway, bedroom, or living room, this DIY rug commands attention and establishes a stylish tone.
Experiment with different color combinations, from monochrome for a sleek look to multi-color for a playful vibe. Use painter’s tape and fabric paint or durable outdoor-safe acrylics. For a more subtle effect, choose pastel hues; for high impact, select bold neon or metallic shades. Rugs of different sizes and shapes allow for designs tailored to your specific space. Changing the colors seasonally can keep your decor feeling fresh.
Begin by selecting a rug with a flat, tightly woven surface to ensure an even paint application. Mask off your chevron pattern with painter’s tape or create stencils for greater precision. Apply fabric or outdoor paint in thin, even coats, allowing each to dry completely. For added durability, seal the design with a clear, waterproof topcoat. You can also add a non-slip backing or bind the edges for safety and a polished finish.
Incorporate metallic or glitter accents into the chevron pattern for a touch of glamour. Customize the colors to match seasonal themes or your personal preference. Use stencils or freehand techniques to create unique variations. Embellish the edges with tassels or fringe for additional detail. This project allows you to transform a simple rug into a unique statement piece that is entirely your own.
![]()
To add a cozy, colorful ambiance to outdoor gatherings or indoor spaces, consider decorating mason jars. While charming on their own, wrapping them with chevron patterns enhances their appeal. These DIY lanterns are simple, inexpensive, and customizable, making them perfect for creating a warm glow.
Imagine a set of mason jars painted with vibrant chevron stripes in shades like coral, mint, and gold. The jars can be wrapped with washi tape or painted directly with acrylics, then illuminated with candles or fairy lights. When lit, they cast colorful, patterned shadows, making any space feel inviting and festive with their cheerful, handcrafted appearance.
Use jars of different sizes for layered lighting effects or mix colors for a rainbow-inspired display. For outdoor applications, choose weatherproof paints or sealants. You can wrap the jars with patterned tapes or paint them with metallic colors for a more luxurious look. Add decorative elements like beads, twine, or small charms to personalize each lantern. For safety and convenience, use battery-operated candles.
To create the lanterns, clean the mason jars thoroughly. You can either use tape to mask off sections for a chevron pattern or paint freehand for a more organic design. Use acrylic or outdoor-safe paint, applying it in thin layers and allowing each to dry completely. Seal the paint with a clear, waterproof topcoat for longevity. Insert candles, LED lights, or fairy lights inside. Arrange the lanterns on tables, hang them from trees, or use them to line walkways for a charming effect.
Personalize the lanterns with initials, small motifs, or color accents within the chevron pattern. Use metallic or glow-in-the-dark paints for a special nighttime effect. Attach decorative elements like ribbons or charms for extra flair. For a rustic look, add twine or burlap around the neck of the jar. These lanterns are ideal for parties, weddings, or creating a cozy atmosphere at home.
![]()
Plain planters can detract from the beauty of even the most vibrant plants. If you want to transform your plant arrangements into eye-catching features, painting chevron patterns on the pots is an excellent solution. It is a simple way to add color and personality without needing to purchase new containers.
Envision a collection of terracotta pots painted with bold chevron stripes in bright shades such as yellow and navy. The pattern enhances the round shape of the pots, making them stand out on shelves or patio tables. A glossy or matte finish adds a polished look, while the patterns provide a modern edge. These painted pots become focal points, elevating the overall presentation of your plants.
You can match the chevron colors to your garden’s theme or choose contrasting tones for a striking effect. Use waterproof or outdoor paints for exterior durability, or opt for chalk paint for a matte, vintage feel indoors. Varying the size and shape of the pots adds visual interest. You can also include decorative elements like metallic accents or stenciled initials for further personalization.
Begin by cleaning your pots thoroughly to remove any dirt or loose particles. Use painter’s tape to mark the chevron pattern, or paint it freehand with a steady hand and a small brush. Apply multiple thin coats of paint, allowing each to dry completely. If the pots will be used outdoors, seal them with a clear waterproof topcoat. Once the paint is dry, you can place your plants inside and arrange them in your desired location.
For a unique effect, layer additional designs such as small motifs, metallic accents, or textured paint. Personalize the pots with hand-painted labels or monograms. Experiment with different color combinations to align with seasonal themes or decor updates. You can also incorporate natural elements like stones or shells around the base for an earthy touch. Painting chevron patterns on planters transforms simple containers into statement pieces that reflect your personal style.
![]()
A cluttered entryway or mudroom can make organization seem like a constant struggle. While functional hooks are essential, they do not have to be plain. Adding chevron patterns to wall hooks transforms a practical item into a stylish feature, offering an upgrade that is both useful and personal.
Consider a row of wooden or metal hooks mounted on a wall, each painted with vibrant chevron stripes in bold colors. The zigzag pattern creates visual interest and draws the eye along the wall. These hooks can hold coats, bags, and scarves while also serving as decorative accents. Their lively pattern provides a fun, modern contrast against a neutral wall.
Customize the color scheme to match your decor, whether bright and cheerful or muted and sophisticated. Use hooks of different shapes and sizes for a varied appearance. Incorporate metallic or neon paints for a contemporary feel. For a rustic look, choose distressed wood with painted or stenciled chevrons. Grouping multiple hooks can maximize their visual and functional impact.
To begin, clean the hooks thoroughly and lightly sand them if necessary. Use painter’s tape to outline the chevron pattern, then apply acrylic or spray paint in thin, even coats. Once the paint is dry, carefully remove the tape to ensure crisp lines. Mount the hooks securely to the wall using the appropriate hardware. For a cohesive look, you can paint all hooks with the same design or create a mix of patterns.
Add small decorative elements like metallic studs or painted accents to the hooks for extra detail. Personalize them with initials or symbols using small stencils or brushes. Incorporate hooks with different finishes—matte, gloss, or metallic—to create visual layers. For a more polished display, you can also mount the hooks on a backing panel that has been painted with a chevron pattern. Chevron wall hooks combine practicality with style, making organization a more enjoyable task.
![]()
Bookshelves can often appear cluttered or uninspired, especially if they lack personal touches. Instead of purchasing expensive designer bookends, consider crafting your own with a bold chevron pattern. This is a simple and stylish solution that adds a splash of color while keeping your favorite books neatly organized.
Imagine a pair of painted wooden or acrylic bookends featuring zigzag stripes in contrasting shades like black and white or bright orange and teal. The pattern creates a striking visual anchor on your shelf, drawing attention and adding a modern touch. The sturdy design supports your books effectively while also serving as a decorative element.
You can choose different sizes and shapes—L-shaped, rectangular, or custom-cut forms—to suit your space. Use metallic or matte paints to achieve different finishes. Incorporate additional decorative motifs or initials for personalization. Match the colors to your room’s theme, or opt for a monochrome look for greater versatility. These custom pieces can complement a wide variety of decor styles.
Start with blank wooden blocks or acrylic sheets and sketch your chevron pattern with a pencil. Use painter’s tape or stencils to outline the design, then fill it in with your chosen paints. Apply multiple thin coats, allowing each to dry thoroughly before proceeding. Seal the bookends with a clear protective finish to prevent chipping. Place them on your shelf, arranging your books between them for stability.
Personalize the bookends with initials, small symbols, or contrasting accents to match your taste. Add metallic or glow-in-the-dark paints for a unique effect. Use textured paints to create dimension, or incorporate small embellishments like rhinestones or beads. You can also paint the interior or underside for a hidden design element. Custom chevron bookends are a practical way to showcase your creativity while maintaining an organized bookshelf.
![]()
If you are looking for an alternative to flat wall decor and desire something with texture, movement, and personality, a fabric wall hanging with a chevron pattern is a cozy and artistic choice. This handmade touch can add warmth and visual interest to your space.
Picture a wooden dowel suspended on a wall, from which hang fabric strips sewn into a chevron pattern in bright colors like peach, mint, and lavender. The layered textures create a sense of depth, while the zigzag pattern adds a playful feel. When placed over a bed or in a reading nook, it softens the space and contributes to a comfortable and stylish atmosphere. The fabric’s movement and vibrant colors bring the wall to life.
For varied textures, use different fabrics such as quilted, woven, or embroidered materials. You can change the color palette to match seasons or moods, from warm earth tones to cool pastel shades. Incorporate decorative trims, tassels, or fringe for additional flair. Varying the length and width of the fabric strips can create a layered, bohemian look. For extra personality, attach small embellishments or patches.
To create the wall hanging, cut fabric into strips or panels, then sew or glue them into a chevron pattern. Attach the fabric to a sturdy dowel or wooden rod using hot glue or sewing stitches, ensuring it is taut and evenly spaced for a neat finish. Hang the piece with a decorative cord or ribbon, making sure it is securely attached. Adjust the length to achieve the desired visual impact.
For a personalized touch, add embroidered initials, small fabric patches, or painted accents. Incorporate beads or metallic threads to add shimmer. Mix different patterns or textures to create a dynamic piece. You can periodically change the fabric colors to match your decor updates or the seasons. A fabric wall hanging with a chevron pattern is a simple, customizable project that enhances your space with a handcrafted feel.
![]()
A functional item that also serves as a visually appealing accent can elevate any space. While clocks are a necessity, they often feature plain and uninspired designs. Creating a chevron-patterned clock is an enjoyable way to introduce personality to your room while keeping track of time with style. This straightforward project yields a significant visual impact.
Imagine a round clock face adorned with bold chevron stripes in striking colors such as red and white or navy and gold. The pattern radiates from the center, drawing focus to the clock hands. This vibrant design can energize a kitchen or workspace, transforming a standard timepiece into a decorative statement piece. The contrast between the graphic pattern and the clock’s functional elements makes it both practical and artistic.
You can select different color schemes to complement your room’s decor, from soft pastels for a serene atmosphere to metallics for a luxurious touch. Use painter’s tape to achieve sharp chevron lines or apply decals for precision. Incorporate various textures or layered paints to add depth. You can also customize the clock hands or add decorative embellishments around the face. For a gallery wall effect, mix and match clocks of different sizes.
To begin, select a plain clock face or a blank circular surface. Lightly sketch your chevron pattern with a pencil or use stencils for guidance. Use painter’s tape to outline each stripe, then apply acrylic or spray paint. Carefully remove the tape to reveal crisp lines. Attach or paint the clock mechanism and hands, ensuring they can move without obstruction. For a polished finish, seal the entire surface with a clear coat. Hang your new custom clock in a location where it can be appreciated daily.
For additional decorative flair, consider applying metallic leaf or glitter within the chevrons. Personalize the clock with initials or motifs in the center. Use contrasting colors or textures to create a more dynamic appearance. Incorporating LED or glow-in-the-dark paint can produce a unique nighttime effect. This project allows you to seamlessly combine practicality with creative expression. DIY chevron clocks are an excellent method for showcasing your style and adding a personalized element to your home.
![]()
A cluttered desk can hinder focus and productivity, and generic storage containers do little to inspire. If you are seeking a stylish way to organize your stationery that also brightens your workspace, using chevron-patterned washi or painter’s tape can transform plain containers into vibrant organizers. This is a quick, customizable solution that is both enjoyable and functional.
Picture clear glass jars wrapped in bright chevron tape, arranged neatly on a desk to hold pens, paper clips, and markers. The zigzag pattern introduces energy and color, making the organization appear attractive. The glossy finish of the tape catches the light, lending a fresh and lively atmosphere to your workspace. It is a simple method for converting everyday items into decorative statements.
Use tape of different widths or colors to create layered patterns, or combine it with other decorative tapes, such as metallic or glitter varieties. Decorate boxes, trays, or even binders with matching patterns for a cohesive look. You can change the tape style seasonally or for special occasions. For a more polished finish, seal the tape with a clear adhesive spray to prevent it from peeling.
Begin by cleaning your containers thoroughly to ensure proper adhesion. Measure and cut strips of chevron tape to fit each item, then apply it carefully, smoothing out any bubbles or wrinkles. You can overlap the edges for a seamless appearance or leave a border for contrast. For added durability, spray the container with a clear sealant after the tape has been applied. Fill it with your supplies and enjoy a well-organized, colorful workspace.
Add small labels or write initials with permanent markers for easy identification. Mix different tape patterns or add decorative stickers to customize each container. Use metallic or holographic tapes for extra shine. You can also layer different tapes to create a multi-textured effect that is visually appealing. This project demonstrates that small details can make a significant difference in improving your workspace’s aesthetics and efficiency.
![]()
If your furniture appears worn or outdated, simple updates like painting the edges can impart a fresh, modern aesthetic. Applying chevron patterns to furniture edges is an effective way to elevate your decor without undertaking a complete renovation.
Imagine a dresser with its top and side edges painted with bright, contrasting chevron stripes in shades like black and gold. This pattern adds a graphic, contemporary element that instantly updates the piece. The sharp zigzag lines draw attention to the furniture’s form and craftsmanship. When placed in a room, it becomes an eye-catching focal point that balances modern flair with a playful design.
You can choose bold or subtle color combinations depending on your decor style—monochrome for a minimalist look or vibrant hues for a more energetic feel. Use painter’s tape to create clean chevron lines along furniture edges or drawers. For a distressed appearance, lightly sand the painted pattern to achieve a vintage effect. Incorporate metallic or matte finishes for different visual textures. This technique is well-suited for dressers, side tables, and headboards.
Prepare your furniture by cleaning and lightly sanding the edges to ensure proper paint adhesion. Use painter’s tape to outline the chevron pattern, pressing it down firmly to prevent paint from bleeding underneath. Apply multiple thin coats of paint, allowing each to dry thoroughly. Carefully remove the tape to reveal crisp lines. Seal the painted areas with a clear topcoat for durability, especially on high-traffic surfaces. Reassemble or reposition your furniture to enjoy its updated appearance.
For a more dramatic effect, add metallic accents or contrasting colors. Customize the pattern with small motifs or initials for a personal touch. Incorporate textured paints or glitter to add dimension. You can change the color palette seasonally or whenever you desire a new look. This simple update can significantly transform the appearance and feel of your furniture, turning it into a statement piece that reflects your creative style.
![]()
Plain fabric curtain tiebacks can appear dull and uninspired, leaving your window treatments feeling incomplete. If you want a simple way to add a touch of style that integrates with your decor, painting chevron patterns on your tiebacks is an easy project that introduces personality and color to your window area.
Visualize fabric tiebacks wrapped with chevron-patterned tape or painted with bold stripes in colors like coral and mint. When used to hold back curtains, they frame the window with a lively, geometric design. The pattern adds a modern element that complements your decor, making even functional items look intentional and stylish. The vibrant colors and crisp lines create a cheerful and cohesive appearance.
Choose different fabrics, such as linen, burlap, or cotton, for varied textures. Use painter’s tape and fabric paint for quick application, or sew chevron-patterned fabric onto the tiebacks for a more polished look. You can change the color scheme based on the season or your mood—soft pastels for spring or deep jewel tones for winter. Add decorative knots, tassels, or metallic accents for extra flair.
To create the tiebacks, measure your curtain rods and cut the fabric or tape to the appropriate size. Use painter’s tape to mark the chevron pattern, then apply fabric or acrylic paints in thin, even layers. Allow the paint to dry completely before removing the tape. If desired, sew or glue the patterned fabric onto the tiebacks. Attach them to your curtains using hooks or loops, ensuring they hold securely. Adjust them for a neat, balanced appearance.
Personalize the tiebacks with monograms, small motifs, or metallic details. Incorporate contrasting colors or textures for visual interest. Use decorative trims or tassels to create a more luxurious feel. You can change the pattern or colors seasonally to keep your decor fresh. These customized tiebacks add a thoughtful, handmade touch that elevates your window treatments, making them appear polished and intentional without a significant investment.
G2G Team
10-13-2025
Let’s Build
Contact us todayGet daily tips and tricks for making your best home.
2025 Green to Gorgeous